Help Center
Install the Attributer plugin in your Bubble app
So you’ve built a Bubble app, launched it and are getting new users signing up for it on a regular basis. Congratulations, that’s an amazing first step!
But in order to scale new customer acquisition and grow your app, you need to know where your signups and customers are coming from in order to know how to get more of them.
Fortunately, Attributer can help. Attributer is a marketing attribution tool that has a plugin for Bubble that makes it super easy to capture UTM parameters and other marketing channel information about your users.
Read on to learn more about Attributer and how to implement it in your Bubble app.
What is Attributer?
Attributer is a tool that, when placed on your website, looks at a bunch of technical information (such as UTM parameters, HTTP referrer information, device, etc.) to figure out where a particular visitor came from.
Based on that technical data, it then categorizes each visit into a series of channels – Paid Search, Organic Search, and Paid Social are good examples – and stores it in the visitor’s browser as a cookie.
Then when that visitor completes a form on your Bubble App (for instance, your app’s signup form), the Attributer plugin makes the channel attribution data available to you to use in Workflows. This allows you to do many things with it, but common examples would be:
- Store it in your User’s table alongside the name, email, company, etc of each of your users, so you can run reports that show you where your user’s are coming from.
- Send it to your CRM or other sales & marketing tools, so you can run reports in those tools or tailor your follow up based on how they got to your site.
How to get Attributer working in your Bubble App
Getting Attributer working with your Bubble app is simple. Just follow these steps:
Step 1: Create an Attributer account
To get started, you’ll need to create an Attributer account at https://app.attributer.io/signup
Attributer is free to try for 14 days, and if you don’t like it you can cancel your subscription anytime from within the Attributer interface (which is built in Bubble by the way).
Step 2: Add the Attributer code snippet to the plugin settings
Once you’ve created an Attributer account and started your free trial, you will be taken to the dashboard where you will given a small snippet of code.
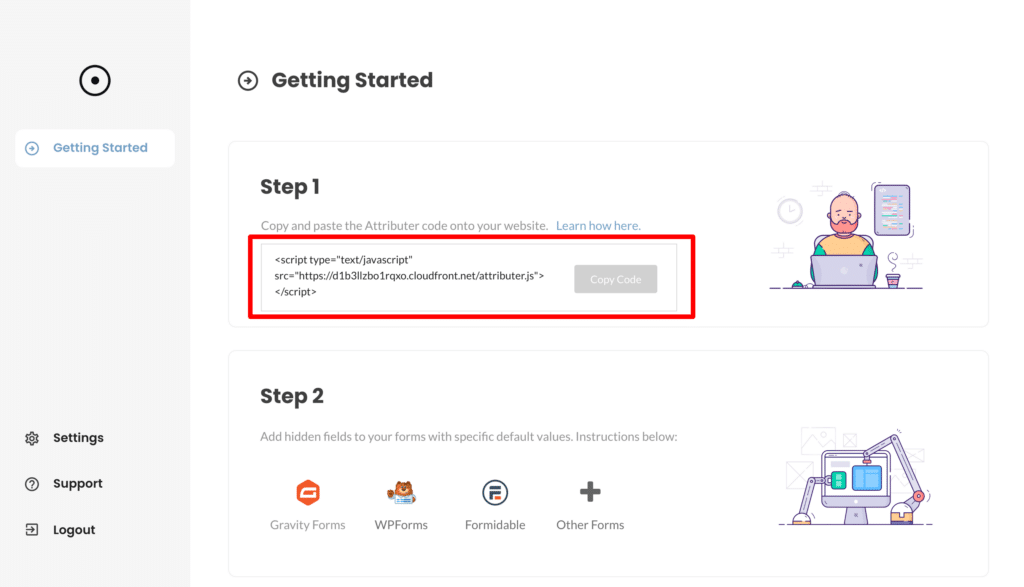
Copy this code from your dashboard and then navigate to the Plugin Settings in your Bubble app and paste the code into the field labelled ‘Code to add to page (headers)’

Step 3: Add the Attributer element to your signup pages
Now that you have the Attributer code installed on your app, you now need to add the Attributer element to any page where you will need to retrieve the marketing channel attribution data that Attributer has stored.
This is any page where you have a form that when a user submits it, you want the attribution data to be available to use in Workflows. Common examples are your app’s signup page, contact us page, request a demo or quote page, etc.
To add the Attributer element to a page, simply drag and drop it from the Visual Elements list on the left hand side.
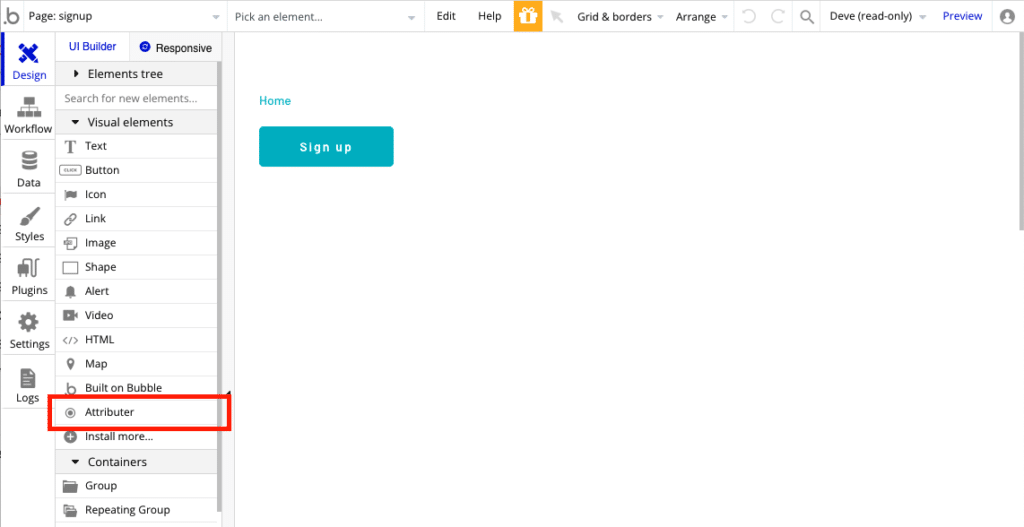
You can place it anywhere on your page. The element is not visible to your users when they are viewing your app so it doesn’t matter where you put it.
You should not need to change the settings for the element at all.
Step 4: Use the data in your Workflows
Now that you have the Attributer element installed on your page(s), you can use the data it captures in your Workflows.
As an example, let’s imagine we’re creating a signup form for our application and we want the data to be stored in the User’s table alongside each user.
We would edit the workflow that we use to sign the user up and add additional fields tp map Attributer’s data from the plugin to our database.

Frequently Asked Questions
Does Attributer work if my marketing website is not built on Bubble but my application is?
Yes, so long as they are at the same domain (I.e. Your marketing site is at www.acmesoftware.com and your application is at app.acmesoftware.com). Simply install the Attributer code snippet on your marketing site as well as adding the plugin to your Bubble application, and then when a visitor lands on your marketing site the data from their visit to your marketing site will be populated in your app.
As an example, let’s imagine you’re Dropbox and your marketing website is at www.dropbox.com and your application is at app.dropbox.com. You’re running Google Ads for terms like ‘cloud storage’ and when a user clicks your ad they are directed to a landing page at www.dropbox.com/features/cloud-storage. If a user likes your product and wants to signup, your call to action button directs them to app.dropbox.com/signup in order to create their account.
So long as you have the Attributer code snipper installed on your marketing site + the plugin installed on your Bubble app, Attributer will pass through the data about their initial visit to your marketing site (I.e. that they came from Paid Search, that their landing page was www.dropbox.com/features/cloud-storage, etc).
What data gets stored in the Channel & Channel Drilldown fields?
Attributer stores different information in the Channel and Channel Drilldown fields depending on what channel the visitor actually arrives from.
For instance, if the visitor arrives from Paid Search then it uses the data in the UTM parameters (I.e. utm_source, utm_campaign, etc) to populate the drilldown fields. But if a user arrives from Organic Search, it stores the name of the search engine (I.e. Google), the URL of the search engine (I.e. www.google.co.uk) and the keyword (where available).
You can see the full documentation of what data Attributer stores here.
I have another question. Can I speak with someone?
Absolutely! We would love to answer any questions you might have and you can contact us here.
Can't find the answer you need? Contact us!
Our team are available to answer any questions you have
