Help Center
Add Hidden Fields to Zoho Bookings
Attributer is a little bit of code you add to your website. It tracks where your visitors are coming from (Paid Search, Paid Social, Organic Search, etc) and writes the data into hidden fields you add to your forms, which is then captured by Zoho Bookings and can be sent to your CRM and other tools.
In order for it to work, you need to add a series of hidden fields to your Zoho Bookings widget. Here’s how to do it:
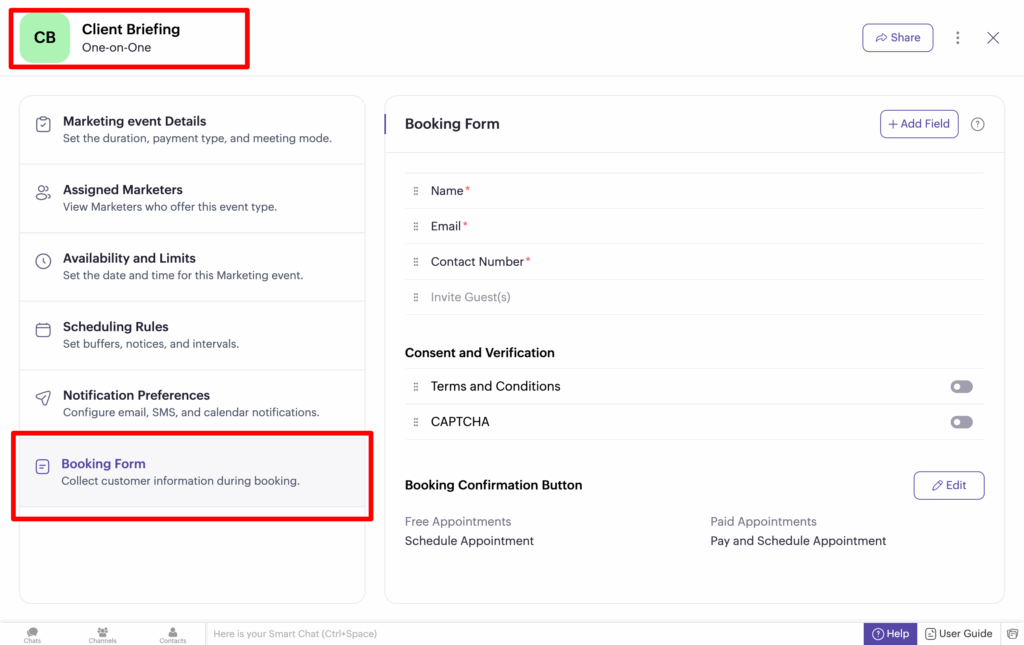
Step 1: Open the booking type you want Attributer to work with
To get started, navigate to the booking type you want Attributer to work with and then select the ‘Booking Form’ option to open the settings for the booking form.
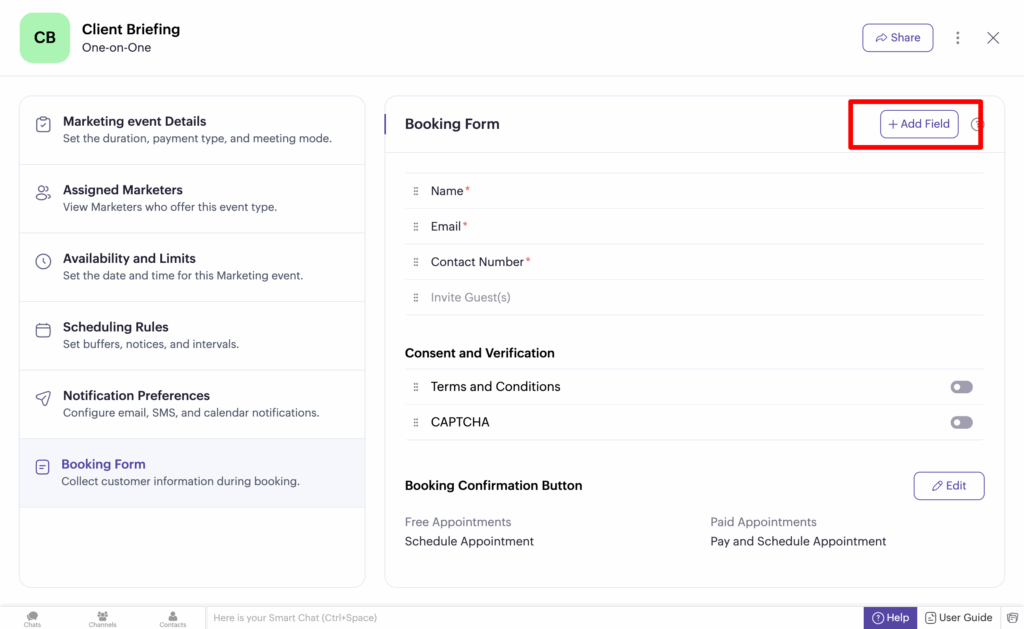
Step 2: Add the first field to your form
Now that the form builder is open, you need to add a ‘Single Line’ field to your form. You can add a new field to your form by selecting the ‘Add Field’ button in the top right corner.
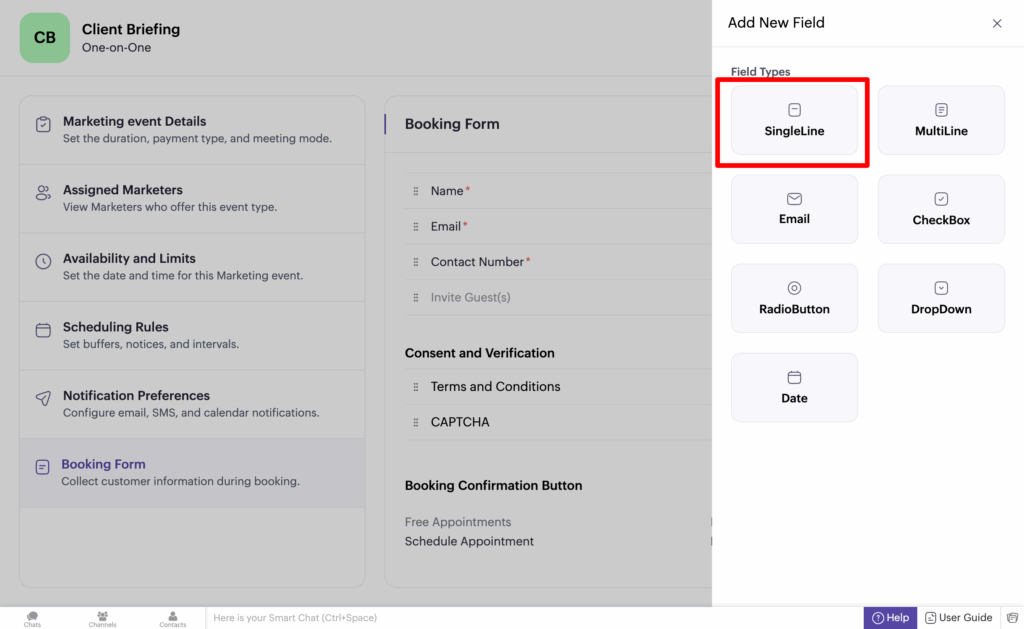
Then, in the sidebar that appears, select the ‘Single Line’ option.
Then, in the next panel that appears, you want to assign a very specific label to the field. The label is ‘channel’ in all lowercase. It should look a bit like this:
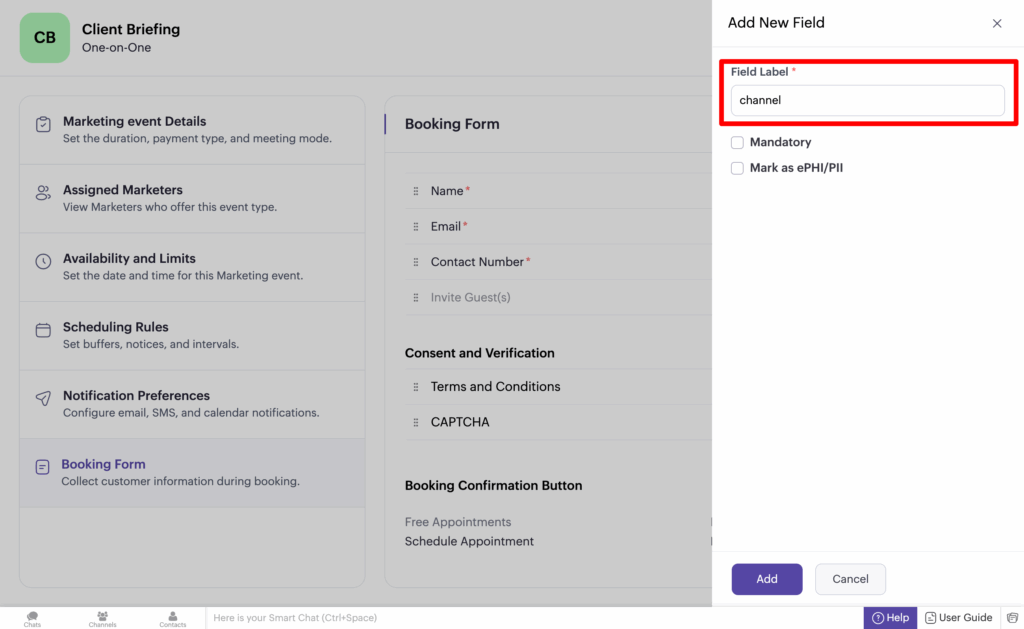
Once done, click the ‘Add’ button at the bottom to add the field to your form.
It’s important that you give this field the label exactly as shown above. It should be ‘channel’ (all lowercase, no quotation marks).
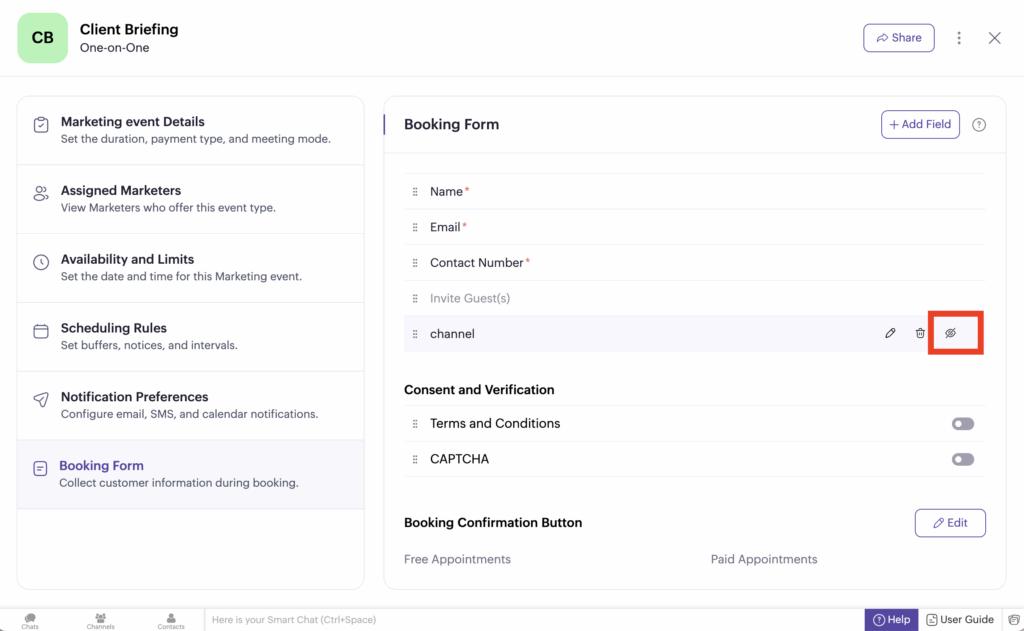
Step 3: Make the field hidden
Now that you have added the first field, you need to make it hidden. To do this, select the eye icon next to the field label.
Step 4: Repeat the above steps to add the additional hidden fields
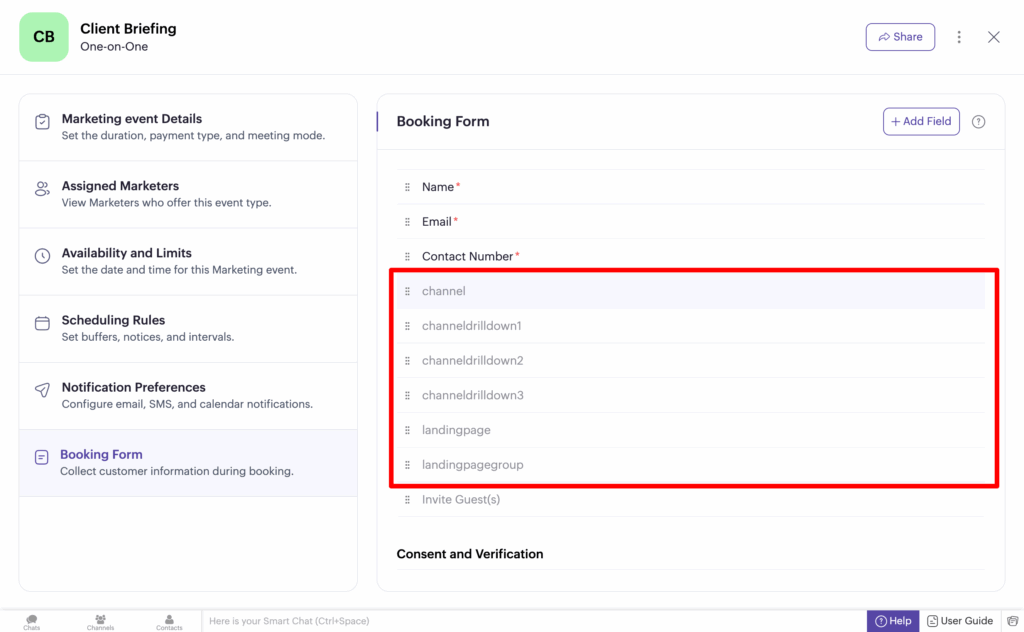
Now that you are familiar with adding fields, giving them a specific label, and hiding them, you need to add 5 more fields with specific labels.
The labels you need to use for the additional fields are:
- channeldrilldown1
- channeldrilldown2
- channeldrilldown3
- landingpage
- landingpagegroup
The labels need to be added exactly as above. All lowercase, no spaces.
Ultimately, you want your form to look like this:
Step 5: Embed the Zoho Bookings widget on your site
If you haven’t already, you can then grab the embed code and place it on your site wherever you want the Zoho Bookings widget to appear.
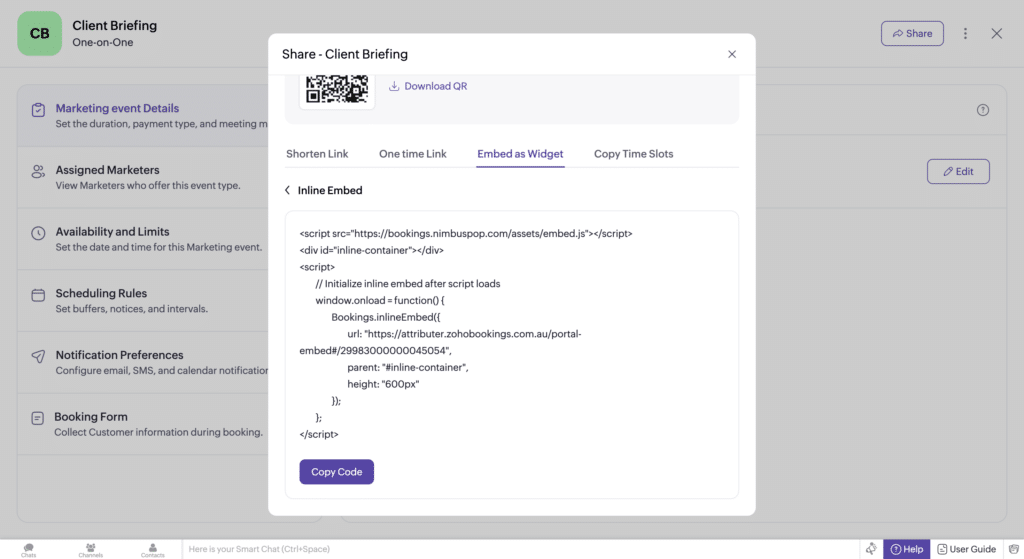
In April 2026, Zoho Bookings 2.0 launched and now uses a different embed code than Zoho Bookings 1.0. If the code you have on your site doesn’t look liek the one above, you will need to re-embed the booking widget on your site using the new code in order for Attributer to work.
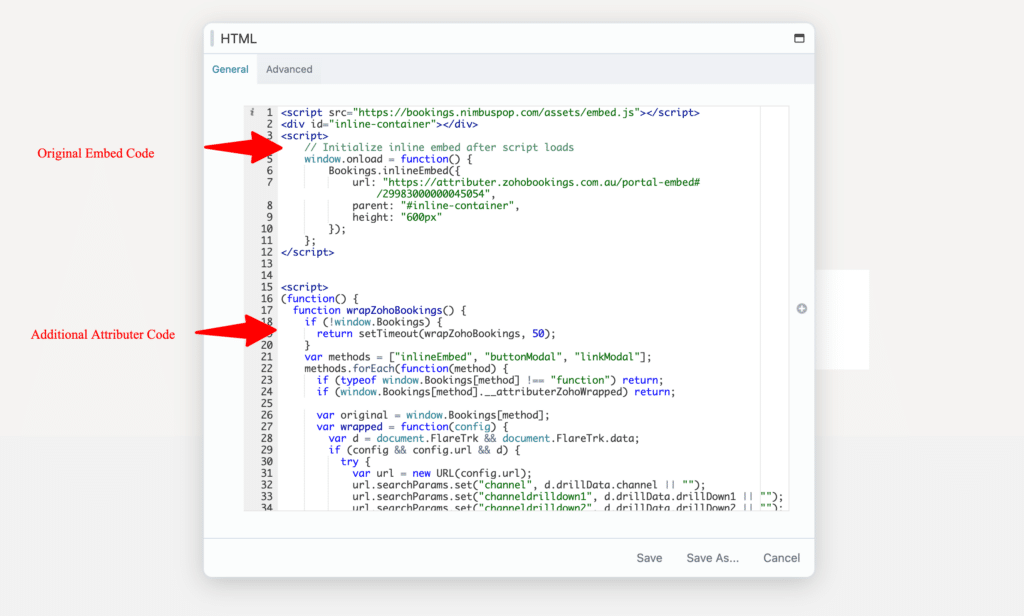
Step 6: Add some additional code to your site
Now that you have added the hidden fields, the next step is to add some additional code to your website.
The code you need to add is:
<script>
(function() {
  function wrapZohoBookings() {
    if (!window.Bookings) {
      return setTimeout(wrapZohoBookings, 50);
    }
    var methods = ["inlineEmbed", "buttonModal", "linkModal"];
    methods.forEach(function(method) {
      if (typeof window.Bookings[method] !== "function") return;
      if (window.Bookings[method].__attributerZohoWrapped) return;

      var original = window.Bookings[method];
      var wrapped = function(config) {
        var d = document.FlareTrk && document.FlareTrk.data;
        if (config && config.url && d) {
          try {
            var params = new URLSearchParams();
            params.set("channel", d.drillData.channel || "");
            params.set("channeldrilldown1", d.drillData.drillDown1 || "");
            params.set("channeldrilldown2", d.drillData.drillDown2 || "");
            params.set("channeldrilldown3", d.drillData.drillDown3 || "");
            params.set("landingpage", d.landing_url || "");
            params.set("landingpagegroup", d.landing_page_group || "");
            var separator = config.url.includes("?") ? "&" : "?";
            config.url = config.url + separator + params.toString().replaceAll("+", "%20");
          } catch (e) { /* fall through */ }
        }
        return original.apply(this, arguments);
      };
      wrapped.__attributerZohoWrapped = true;
      window.Bookings[method] = wrapped;
    });
  }
  wrapZohoBookings();
})();
</script>
If you just have one Zoho Bookings widget on your site (on your Request Consultation page for instance), then the best thing to do is just to add it to the bottom of the HTML or Code block you use to embed the Zoho Bookings widget. See below:
Alternatively, if you have a Zoho Bookings widget on multiple pages of your site, then you can just add it to the Head of your whole site (usually through the Settings section of your site in an option called something like ‘Scripts’ or ‘Custom Code’).
Step 7: Test it works
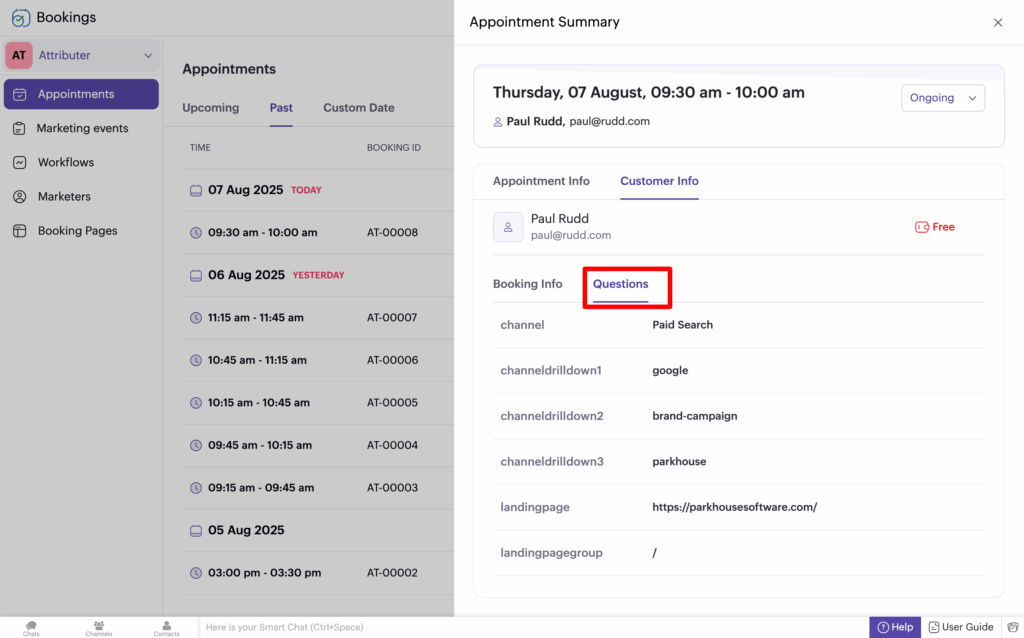
You can test it works by completing the booking widget on your site and then reviewing the data in your Zoho Bookings account (it will appear with each booking under the ‘Questions’ tab)
When testing, make sure to use a new incognito window each time. You can read more about how to test Attributer here.
A final note
We understand editing code can be a bit scary, so if you need help then we are happy to jump on a video call with you and walk you through it. Feel free to contact us here.
Can't find the answer you need? Contact us!
Our team are available to answer any questions you have
