Help Center
Set up Attributer with Qualified
Attributer is a little bit of code you add to your website. It tracks where your visitors are coming from (I.e. Paid Search, Paid Social, Organic Search, etc) and then passes the data into Qualified as Visitor Fields, so you can see exactly how each lead found your site when they start a chat or book a meeting through Qualified.
This data then flows through Qualified’s native Salesforce integration and into your Lead/Contact records automatically.
In order for it to work, you need to follow the steps below:
Step 1: Created a series of Visitor Fields in Qualified
Before adding the code, you first need to create custom Visitor Fields in Qualified that will store the Attributer data. To do this, log in to your Qualified account and navigate to Settings → App Settings → Visitor Fields.
Once you’re on the Visitor Fields page, click the “+” icon and create the following fields:
| Field Name | API Name | Type |
| Channel | attributer_channel | Text |
| Channel Drilldown 1 | attributer_channel_drilldown_1 | Text |
| Channel Drilldown 1 | attributer_channel_drilldown_2 | Text |
| Channel Drilldown 3 | attributer_channel_drilldown_3 | Text |
| Channel Drilldown 4 | attributer_channel_drilldown_4 | Text |
| Landing Page | attributer_landing_page | Text |
| Landing Page Group | attributer_landing_page_group | Text |
Important: The API Names must match exactly what is shown above (all lowercase, with underscores). The integration code uses these API Names to write the data into the correct fields.
Step 2: Copy the below code
The next step is to copy the below code to your clipboard. This snippet of code uses Qualified’s built-in qualified('identify') function to pass the attribution data into the Visitor Fields you created in Step 1.
<!--
  Attributer → Qualified Integration
  Version: 1.0

  This script waits for Attributer to load, then
  sends attribution data into Qualified Visitor Fields
  via the qualified('identify') JavaScript API.
-->

<script>
(function() {

  function onDomReady(cb) {
    if (document.readyState === "interactive" || document.readyState === "complete") {
      cb();
    } else {
      document.addEventListener("DOMContentLoaded", cb);
    }
  }

  onDomReady(function() {
    var MAX_WAIT = 15000;
    var POLL_INTERVAL = 200;
    var startTime = Date.now();
    var dataSent = false;

    function isAttributerReady() {
      return !!(document.FlareTrk &&
                document.FlareTrk.data &&
                document.FlareTrk.data.drillData);
    }

    function sendToQualified() {
      if (dataSent) return;

      try {
        var flare = document.FlareTrk;
        var d = flare.data || {};
        var drill = d.drillData;

        // Fallback if drillData isn't populated yet
        if ((!drill || typeof drill !== "object") && typeof flare.DPdrillData === "function") {
          drill = flare.DPdrillData() || {};
        }
        if (!drill) drill = {};

        var fieldValues = {
          attributer_channel: drill.channel || '',
          attributer_channel_drilldown_1: drill.drillDown1 || '',
          attributer_channel_drilldown_2: drill.drillDown2 || '',
          attributer_channel_drilldown_3: drill.drillDown3 || '',
          attributer_channel_drilldown_4: drill.drillDown4 || '',
          attributer_landing_page: d.landing_url || d.landingURL || '',
          attributer_landing_page_group: d.landing_page_group || ''
        };

        // Add click IDs if present
        if (d.gclid)   fieldValues.attributer_gclid = d.gclid;
        if (d.fbclid)   fieldValues.attributer_fbclid = d.fbclid;
        if (d.msclkid)  fieldValues.attributer_msclkid = d.msclkid;
        if (d.gbraid)   fieldValues.attributer_gbraid = d.gbraid;
        if (d.wbraid)   fieldValues.attributer_wbraid = d.wbraid;

        // Add any custom fields configured in Attributer
        if (d.customFields && typeof d.customFields === "object") {
          for (var key in d.customFields) {
            if (!d.customFields.hasOwnProperty(key)) continue;
            var value = d.customFields[key];
            if (value == null || value === "") continue;
            fieldValues["attributer_custom_" + key.toLowerCase()] = String(value);
          }
        }

        if (typeof qualified === 'function') {
          qualified('identify', fieldValues);
          dataSent = true;
        }

      } catch (e) {
        console.error("Error sending Attributer data to Qualified:", e);
      }
    }

    function poll() {
      if (dataSent) return;
      if (Date.now() - startTime > MAX_WAIT) return;

      if (isAttributerReady()) {
        sendToQualified();
      } else {
        setTimeout(poll, POLL_INTERVAL);
      }
    }

    poll();
  });

})();
</script>
Step 2: Add the code beneath your Qualified embed code
The next step is to place this additional snippet of code directly beneath the embed code you got from your Qualified account (the one that installs Qualified on your website).
See screenshot below:
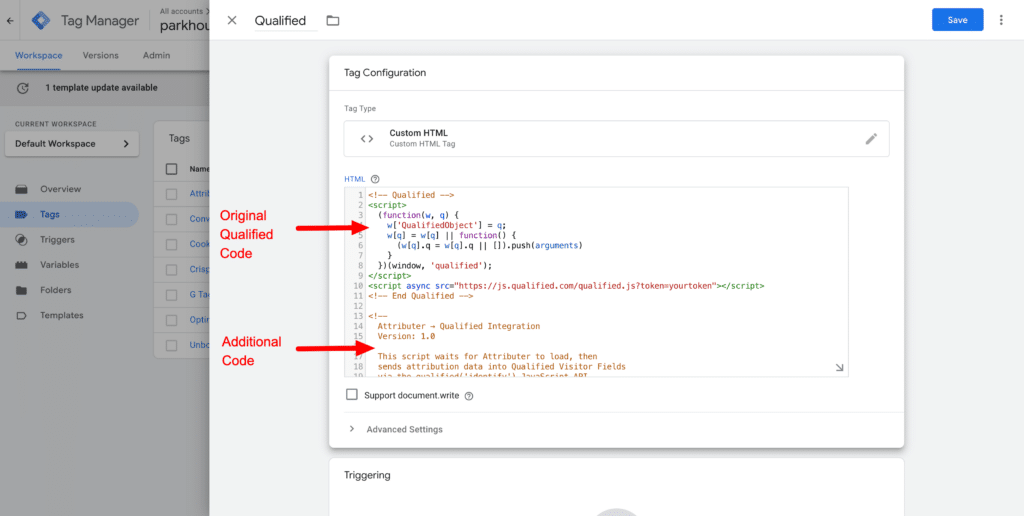
Note: If you prefer, you can also add this code as a separate Custom HTML tag in Google Tag Manager. The code is designed to work regardless of load order, so it doesn’t need to be placed directly beneath your Qualified code if you’d prefer to keep it separate.
Step 3: Test it works
The final step is to test it works. You can do this by navigating to your website in a new incognito window (add UTM parameters to the URL so Attributer has data to pass, for example: ?utm_source=google&utm_medium=cpc&utm_campaign=test-campaign).
Once the page loads, open the Qualified admin panel, go to the Live Stream, and find your visitor session. You should see the Attributer data populated in the Visitor Fields.
We would also recommend reading this article for further information on how to test different channels (I.e. Organic Search, Paid Search, etc).
Can't find the answer you need? Contact us!
Our team are available to answer any questions you have
