Help Center
Add hidden fields to Unbounce popups
This article guides you through adding the hidden fields to forms on Unbounce popups. If you want to use Attributer with forms on Unbounce landing pages, read this article.
Attributer is a little bit of code you add to your website. It tracks where your visitors are coming from (I.e. Paid Search, Paid Social, Organic Search, etc) and writes the data into hidden fields you add to your forms. This data is then captured in Unbounce with each form submission and can be sent to your CRM and other tools.
In order for it to work, you need to add a series of hidden fields to your Unbounce forms. Here’s how to do it:
Step 1: Open the popup you want Attributer to work with
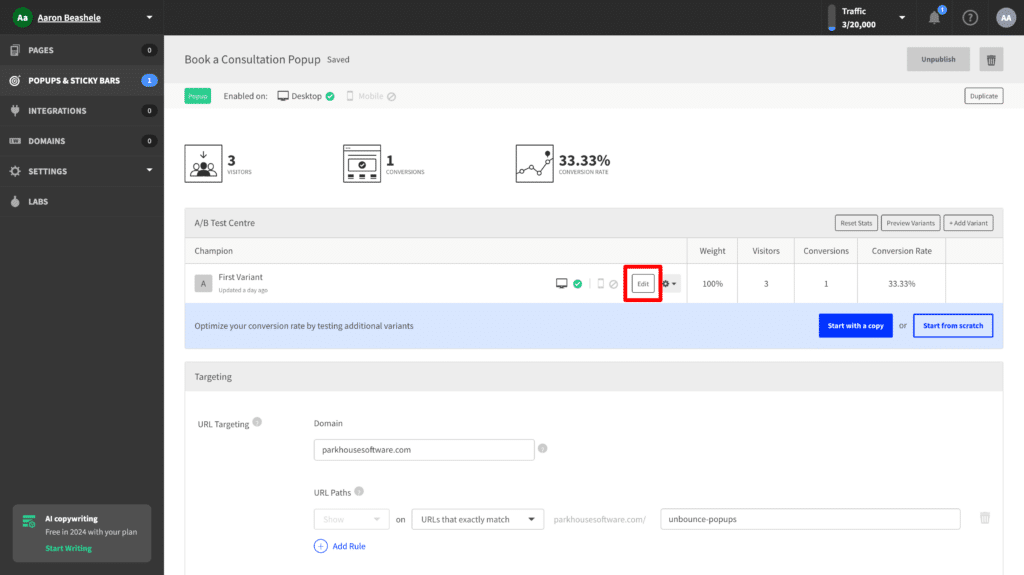
In your Unbounce account, open the popup you want Attributer to work with and click the ‘Edit’ button next to the variant you want to get Attributer setup on (If you have multiple variants and you want Attributer to work on all of them, you will need to repeat these steps in each variant).

Step 2: Add 6x ‘Hidden Fields’ to the form
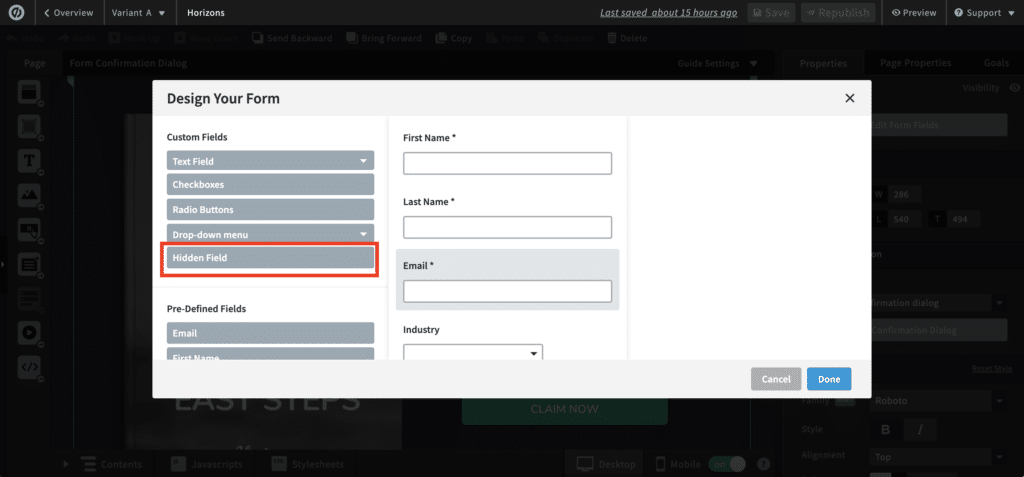
To get started adding form fields, simply click on the form on your landing page and this will open the ‘Design Your Form’ popup box.
Next, click on the ‘Hidden’ field type on the left hand side of the ‘Design Your Form’ popup and this will add a hidden field into your form. To collect all the information that Attributer provides, you will need to add 6x hidden fields to your form.

By default Unbounce will add these to the bottom of your form below the other fields. It doesn’t particularly matter where in your form the hidden fields are, but for easy organisation we’d recommend leaving them at the bottom.
Step 3: Configure the fields
Next, you need to configure each of the 6 hidden fields to ensure that Attributer knows which form fields to write the attribution data into.
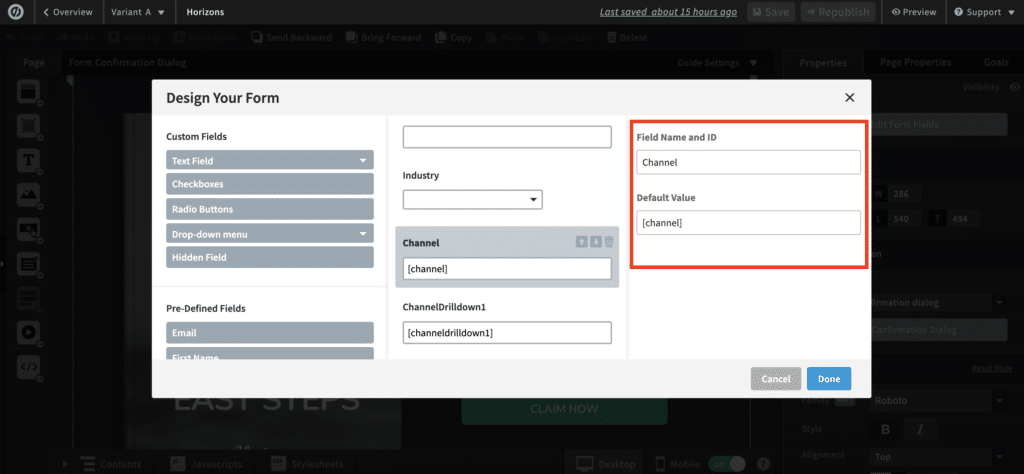
To configure a field simply click on it and the configuration options will appear on the right hand side of the ‘Design Your Form’ popup.

For each of the 6x hidden fields, add the following information:
Hidden Field #1
- Field Name and ID = channel
- Default Value = [channel]
Hidden Field #2
- Field Name and ID = channeldrilldown1
- Default Value = [channeldrilldown1]
Hidden Field #3
- Field Name and ID = channeldrilldown2
- Default Value = [channeldrilldown2]
Hidden Field #4
- Field Name and ID = channeldrilldown3
- Default Value = [channeldrilldown3]
Hidden Field #5
- Field Name and ID = landingpage
- Default Value = [landingpage]
Hidden Field #6
- Field Name and ID = landingpagegroup
- Default Value = [landingpagegroup]
It’s important the above details are copied exactly. The ‘Field Name and ID’ should be all lowercase with no spaces, and the Default Values should have the square brackets around them.
Step 4: Add code to your website
Finally, you need to add an additional bit of code to your website. The code is as follows:
<script>
function updateUB() {
   const el = document.querySelector("iframe.ub-emb-iframe");
   if (!el) {
    return window.requestAnimationFrame(updateUB);
   }


   el.setAttribute("data-attributer-iframe", "true");
}


updateUB();
</script>
This can be added in the same way you added the main Attributer code to your website (which varies depending on what website builder you use).
That’s it! Now that you have added the hidden fields to your forms Attributer will begin writing the marketing attribution information into them for each new lead, and that can then flow into your CRM and other tools.
Can't find the answer you need? Contact us!
Our team are available to answer any questions you have

