Help Center
Add Hidden Fields to Zoho Bookings
Attributer is a little bit of code you add to your website. It tracks where your visitors are coming from (Paid Search, Paid Social, Organic Search, etc) and writes the data into hidden fields you add to your forms, which is then captured by Zoho Bookings and can be sent to your CRM and other tools.
In order for it to work, you need to add a series of hidden fields to your Zoho Bookings widget. Here’s how to do it:
Step 1: Open the booking type you want Attributer to work with
To get started, navigate to the booking type you want Attributer to work with and then select the ‘Booking Form’ option to open the settings for the booking form.

Step 2: Add the first field to your form
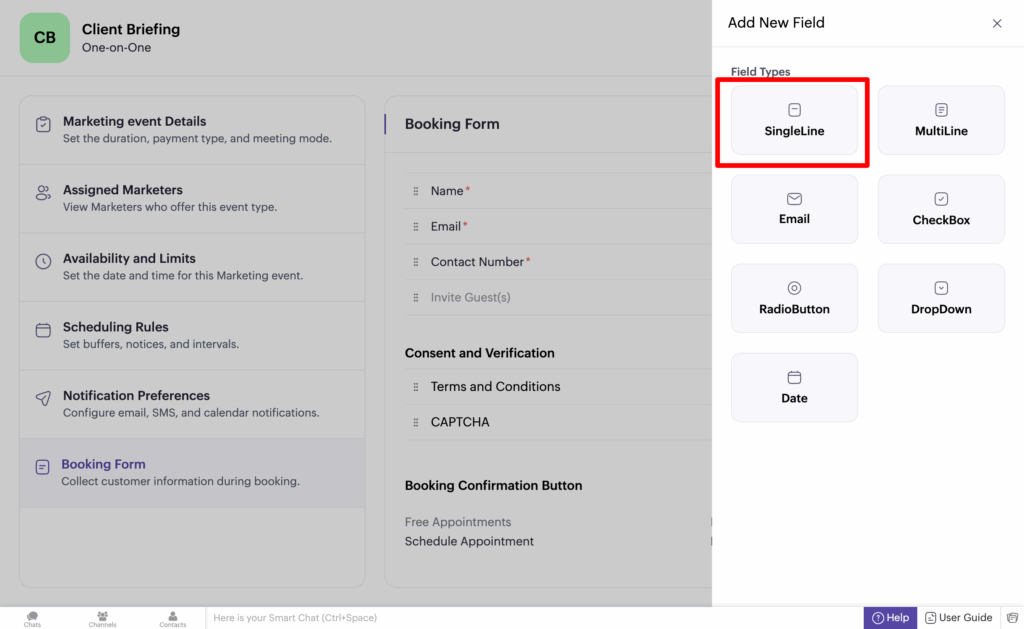
Now that the form builder is open, you need to add a ‘Single Line’ field to your form. You can add a new field to your form by selecting the ‘Add Field’ button in the top right corner.

Then, in the sidebar that appears, select the ‘Single Line’ option.
Then, in the next panel that appears, you want to assign a very specific label to the field. The label is ‘channel’ in all lowercase. It should look a bit like this:
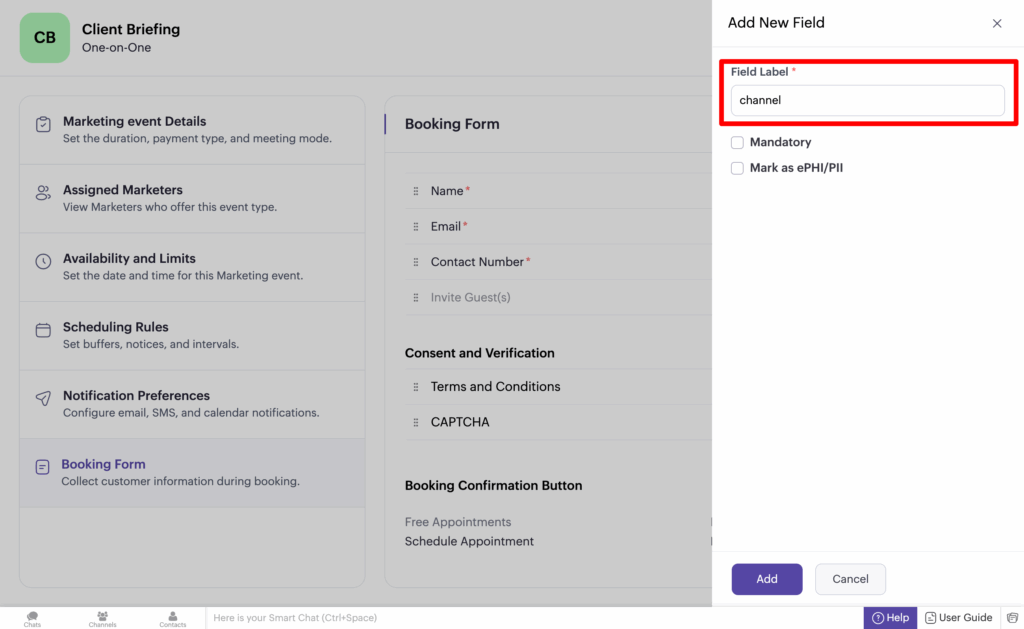
Once done, click the ‘Add’ button at the bottom to add the field to your form.
It’s important that you give this field the label exactly as shown above. It should be ‘channel’ (all lowercase, no quotation marks).
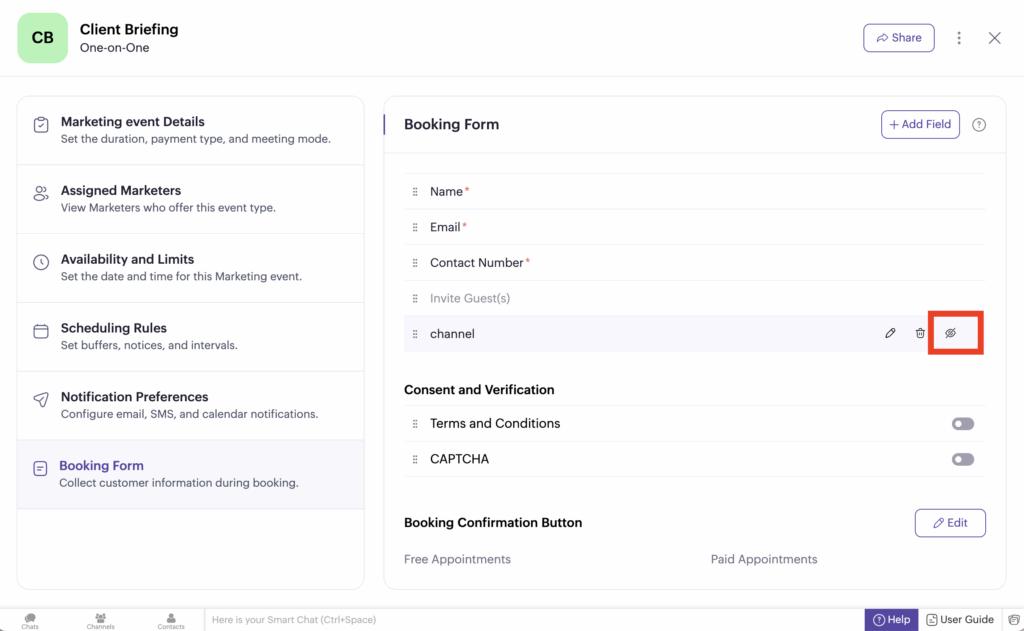
Step 3: Make the field hidden
Now that you have added the first field, you need to make it hidden. To do this, select the eye icon next to the field label.
Step 4: Repeat the above steps to add the additional hidden fields
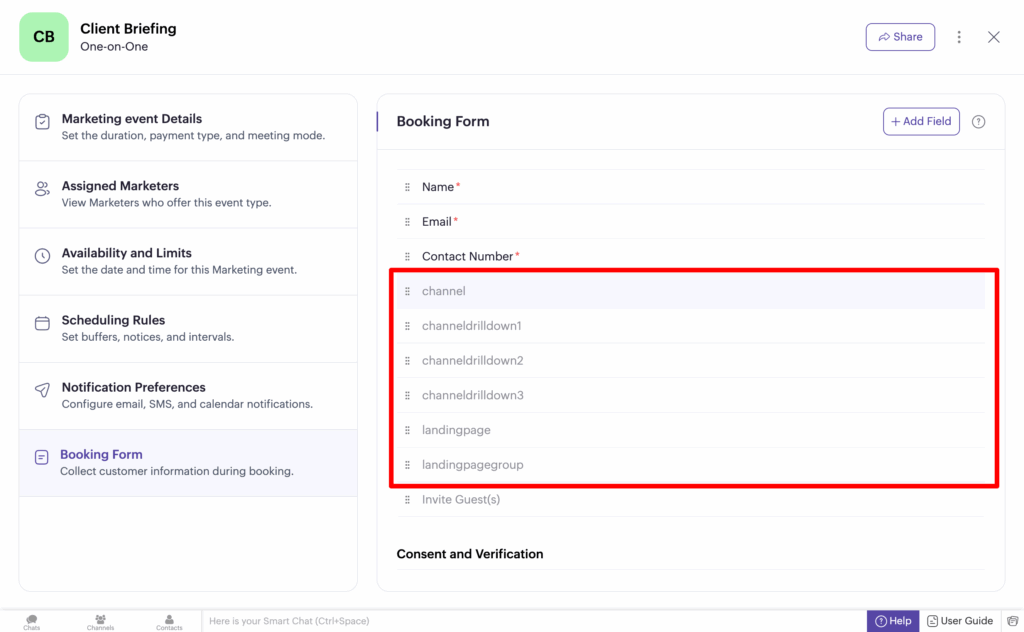
Now that you are familiar with adding fields, giving them a specific label, and hiding them, you need to add 5 more fields with specific labels.
The labels you need to use for the additional fields are:
- channeldrilldown1
- channeldrilldown2
- channeldrilldown3
- landingpage
- landingpagegroup
The labels need to be added exactly as above. All lowercase, no spaces.
Ultimately, you want your form to look like this:
Step 5: Copy and tweak the embed code
Now that you have added the hidden fields with specific labels, it’s now time to get the embed code for your widget and make some changes to it.
To do this, select the ‘Share’ menu item at the top of the Form Builder and then select the ‘Embed as Widget’ tab.
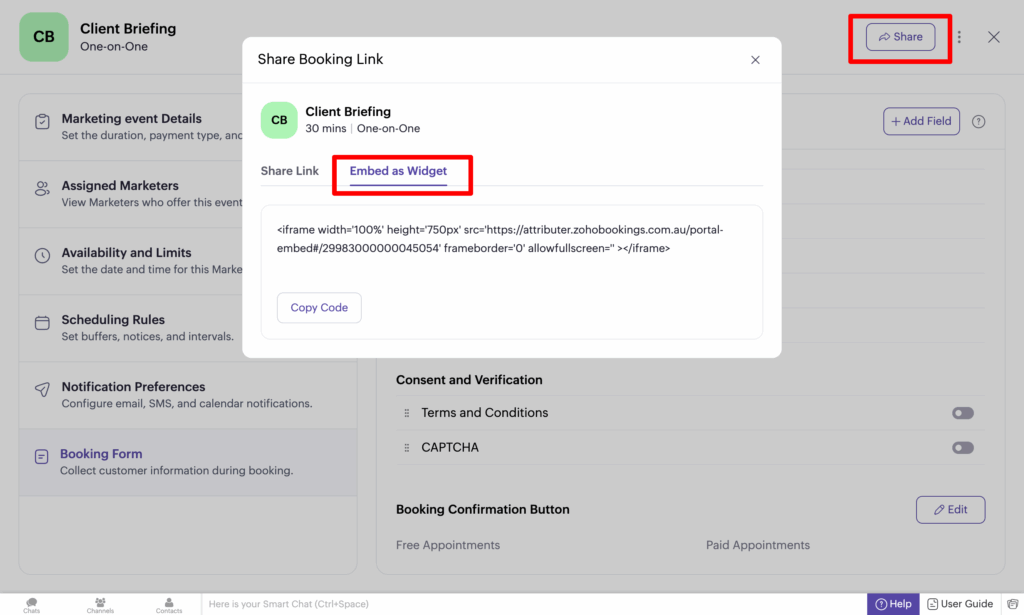
Next, copy the code from the box (the bit of code that starts with <iframe width=”100%″…..) and paste it into any sort of word editing tool (I.e. Microsoft Word, Google Drives, the Notes app on your computer, etc). Anywhere where you can edit the text of the code.
Now you just need to make a small tweak to the embed code. In between the words ‘iframe’ and ‘width’ you want to add the following text:
data-attributer-zoho-iframe="true"So if your code previously looked like this:
<iframe width='100%' height='750px' src='https://attributer.zohobookings.com.au/portal-embed#/29983000000045054' frameborder='0' allowfullscreen='' > </iframe>You would want to change it so that it looked like this:
<iframe data-attributer-zoho-iframe="true" width='100%' height='750px' src='https://attributer.zohobookings.com.au/portal-embed#/29983000000045054' frameborder='0' allowfullscreen='' > </iframe>What you are essentially doing here is giving the iFrame a name (you are naming it ‘data-attributer-iframe’) which Attributer can then look for and write the data into.
The reason you need to do this is that an iFrame is essentially a window that shows another page on your website. So when you insert the form via an iFrame you are not actually adding the form to your website, but instead you are adding a window to your website and the form displays inside it.
So you need to give this iFrame a specific name so that Attributer can look for it and know how to write the data to the form inside it.
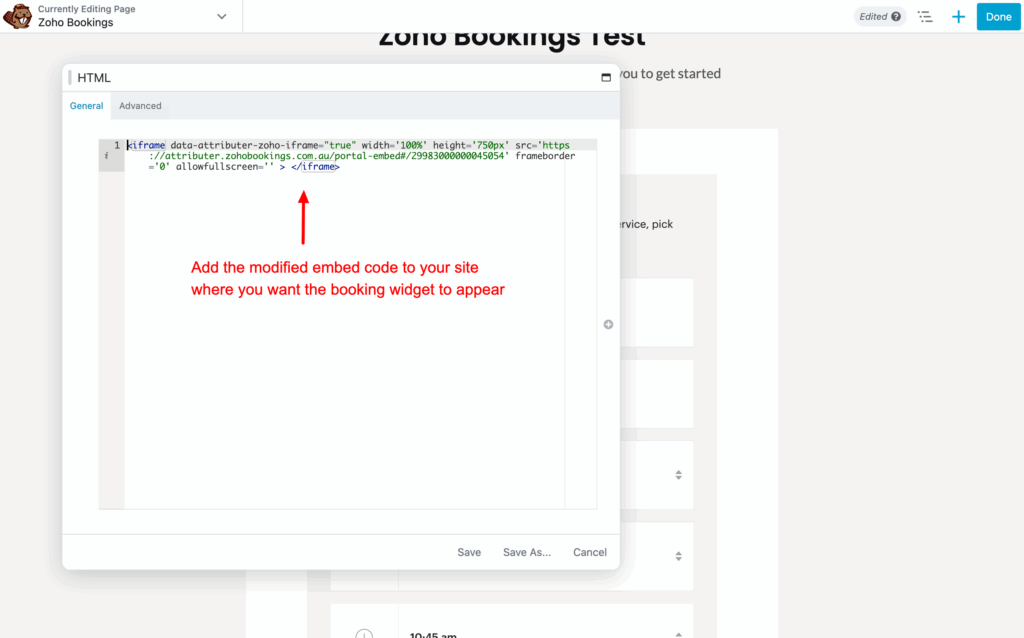
Step 6: Add the modified embed code to your website
Now that you have modified the embed code and given the iFrame a name, you can paste it onto your website where you want the booking widget to appear.
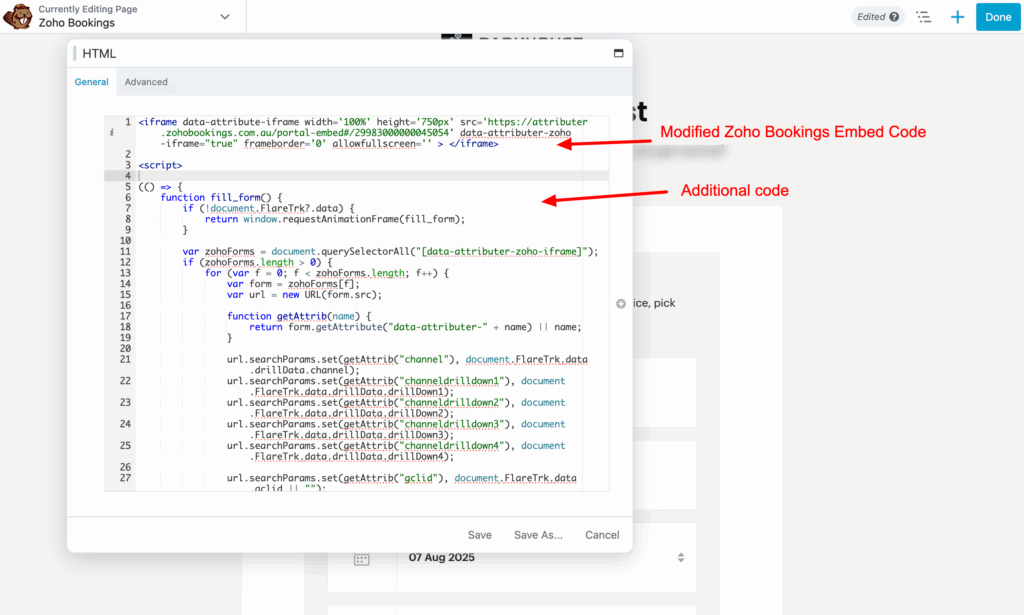
Step 7: Add some additional code below the embed code
The last step is to add some additional code directly underneath the embed code you just modified and added to your site in steps 5 and 6.
The code you need to add is:
<script>

(() => {
    function fill_form() {
        if (!document.FlareTrk?.data) {
            return window.requestAnimationFrame(fill_form);
        }

        var zohoForms = document.querySelectorAll("[data-attributer-zoho-iframe]");
        if (zohoForms.length > 0) {
            for (var f = 0; f < zohoForms.length; f++) {
                var form = zohoForms[f];
                var url = new URL(form.src);

                function getAttrib(name) {
                    return form.getAttribute("data-attributer-" + name) || name;
                }

                url.searchParams.set(getAttrib("channel"), document.FlareTrk.data.drillData.channel);
                url.searchParams.set(getAttrib("channeldrilldown1"), document.FlareTrk.data.drillData.drillDown1);
                url.searchParams.set(getAttrib("channeldrilldown2"), document.FlareTrk.data.drillData.drillDown2);
                url.searchParams.set(getAttrib("channeldrilldown3"), document.FlareTrk.data.drillData.drillDown3);
                url.searchParams.set(getAttrib("channeldrilldown4"), document.FlareTrk.data.drillData.drillDown4);

                url.searchParams.set(getAttrib("gclid"), document.FlareTrk.data.gclid || "");
                url.searchParams.set(getAttrib("msclkid"), document.FlareTrk.data.msclkid || "");
                url.searchParams.set(getAttrib("fbclid"), document.FlareTrk.data.fbclid || "");
                url.searchParams.set(getAttrib("gbraid"), document.FlareTrk.data.gbraid || "");
                url.searchParams.set(getAttrib("wbraid"), document.FlareTrk.data.wbraid || "");
                url.searchParams.set(getAttrib("id"), document.FlareTrk.data.id || "");

                url.searchParams.set(getAttrib("landingpage"), document.FlareTrk.data.landing_url);
                url.searchParams.set(getAttrib("submitpage"), document.FlareTrk.data.submitPage);
                url.searchParams.set(getAttrib("testingdata"), document.FlareTrk.data.test_data);
                url.searchParams.set(getAttrib("landingpagegroup"), document.FlareTrk.data.landing_page_group);
                url.searchParams.set(getAttrib("conversiondays"), document.FlareTrk.data.conversiondays);
                url.searchParams.set(getAttrib("visits"), document.FlareTrk.data.visits);

                for (var dp = 0; dp < document.FlareTrk.settings.customFields.length; dp++) {
                    const key = document.FlareTrk.settings.customFields[dp];
                    url.searchParams.set(getAttrib(`custom-${key}`), document.FlareTrk.data["customFields"][key] || "");
                }

                const new_url = `${url.origin}${url.pathname || ""}${url.hash || ""}${url.search || ""}`.replaceAll("+", " ");
                if (new_url != form.src) {
                    form.src = new_url;
                }
            }
        } else {
            return window.requestAnimationFrame(fill_form);
        }
    }
    fill_form();
})();


</script>
You need to add it directly beneath the main embed code you modified earlier.
That’s it! You’re done!
Step 8: Test it works
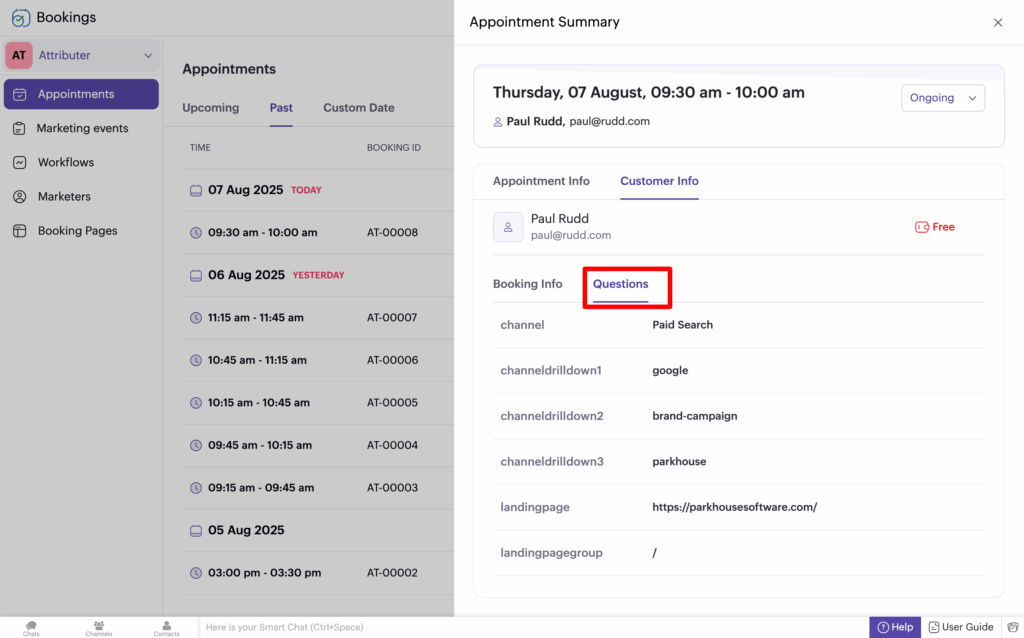
You can test it works by completing the booking widget on your site and then reviewing the data in your Zoho Bookings account (it will appear with each booking under the ‘Questions’ tab)
When testing, make sure to use a new incognito window each time. You can read more about how to test Attributer here.
A final note
We understand editing code can be a bit scary, so if you need help then we are happy to jump on a video call with you and walk you through it. Feel free to contact us here.
Can't find the answer you need? Contact us!
Our team are available to answer any questions you have
